
A garage can become one of the most useful spaces in your home when every decision supports how your household actually lives. The strongest transformations do more than hide clutter. They coordinate a durable floor, purposeful storage, better lighting, and clear zones for parking, projects, and everyday gear.
A complete garage makeover starts with decluttering and a measured plan, then brings together professional floor coatings, cabinets, overhead storage, lighting, and organization. Garage Kings can develop a coordinated solution through an in-home assessment, with 3D design visualization using AR technology where applicable. Explore real garage transformation before and after examples to see how layout and finishes can change the way a space feels and functions.
Schedule a free, no-obligation in-home design consultation.
Before selecting finishes or storage, define what the garage must do for you. A thoughtful plan prevents crowded walkways, mismatched purchases, and storage that looks organized but does not fit your routine.
How To Plan A Garage Makeover Before Installation
A successful garage makeover starts with decisions, not products. Before selecting cabinets, storage racks, or a new floor finish, define how the space needs to work for your household. Is the garage primarily for parking, workshop projects, sports equipment, lawn supplies, or a combination of uses? Your answer determines what should remain accessible, what can move overhead, and how much clear floor area must be protected.
Keep the plan evergreen by focusing on the way your household uses the garage every week, rather than organizing around a single season or holiday. A practical sequence is:
- Clear the space before buying storage. Remove everything that is not attached, sweep the floor, and give yourself enough room to see the walls, corners, doors, and walking paths. Decluttering is a foundational first step because it prevents you from designing storage around items you no longer need.
- Sort every item into keep, donate, or discard. Broken tools, empty containers, and unusable equipment should not occupy valuable space. Usable items that no longer serve your household may be donated. This sorting process reveals the volume and type of storage you actually need, instead of encouraging you to purchase bins and shelving for unnecessary belongings.
- Measure the walls, ceiling, and fixed obstacles. Record wall lengths, ceiling height, door swing, windows, electrical outlets, steps, and any equipment that must stay in place. Include the dimensions of vehicles and allow comfortable clearance around them. Accurate measurements help prevent a cabinet, workbench, or overhead rack from interfering with parking or access.
- Sketch functional zones before installation. Mark a parking zone, an everyday-access zone, a project or workbench zone, and storage zones for less frequently used items. Place tools near the area where projects happen. Keep frequently used sports or household equipment within easy reach, while considering ceiling storage for items that are accessed less often. A simple layout or blueprint makes these relationships easier to evaluate before materials are ordered.
- Sequence the work from preparation to organization. Complete clearing, cleaning, repairs, and measurements first. Plan wall, ceiling, and floor improvements before loading the room with cabinets and stored items. Then assign each kept item a home and label or group items by use. This order reduces rework and makes the finished space easier to maintain.
As you refine the layout, compare the intended result with examples of a garage transformation before and after. Look beyond appearances and notice how the finished design preserves parking, creates clear walkways, and places storage where it supports daily routines. A thoughtful plan gives every installation decision a purpose and sets up the flooring, storage, and organization choices that follow.
Build A Durable Foundation With Garage Floor Coating
The floor sets the visual and functional baseline for the entire garage. A worn, stained concrete slab can make even well-planned storage feel unfinished. While a coordinated coating gives the room a cleaner starting point for cabinets, work areas, parking, and everyday use. It also helps define the garage as an extension of the home rather than a place where miscellaneous items accumulate.
Garage Kings documents professional polyaspartic and epoxy floor systems designed for durability, stain and chemical resistance, moisture resistance, slip resistance, easier cleaning, and improved appearance. Those benefits matter in a working garage. Automotive fluids, wet equipment, tracked-in dirt, and routine traffic can all challenge an untreated surface. A properly selected coating system creates a more practical surface to sweep, wipe, and maintain as the rest of the garage makeover comes together.
Choose The System For How You Use The Space
Flooring should follow the demands of the room, not just its color scheme. A garage used primarily for parking and household storage may have different performance needs from one that doubles as a workshop, hobby area, or active project space. Garage Kings documents three-coat, four-coat, and six-coat options, with system selection based on desired performance and use. That gives the design conversation a useful starting point: consider traffic, moisture, chemical exposure, cleaning habits, and the activities the floor must support before choosing a finish.
Preparation is part of the result. The existing concrete condition, surface contamination, and areas requiring attention should be assessed before coating begins. Curing requirements also matter after installation. Exact timing depends on the selected services, preparation, and cure requirements. So homeowners should plan access around the project-specific instructions rather than assume every garage follows the same schedule. Garage Kings reports that most projects are completed in one day, but that statement is not a fixed promise for every project.
Use Flakes To Coordinate The Finish
Decorative flakes add more than visual interest. A blended finish can soften the appearance of everyday dust and minor debris while helping the floor connect with wall colors, cabinetry, and other design choices. Garage Kings documents fourteen signature flake blends, giving homeowners a way to choose a look that feels intentional instead of treating the floor as an afterthought. Review the available garage floor coating colors alongside the planned storage and lighting palette, then select a combination that supports the way the garage will be used.
When the coating, storage, and daily zones are considered together, the floor becomes the foundation for a durable, easier-to-maintain transformation.
Add Cabinets And Overhead Storage That Fit Your Routine
Storage works best when it follows the way your household uses the garage. Before choosing a cabinet finish or rack layout, group belongings by task and frequency. Automotive products, tools, sports equipment, lawn and garden supplies, seasonal decorations, and cleaning supplies should not all compete for the same shelf. A clear map helps you place everyday items within easy reach while moving occasional-use items higher or farther back.
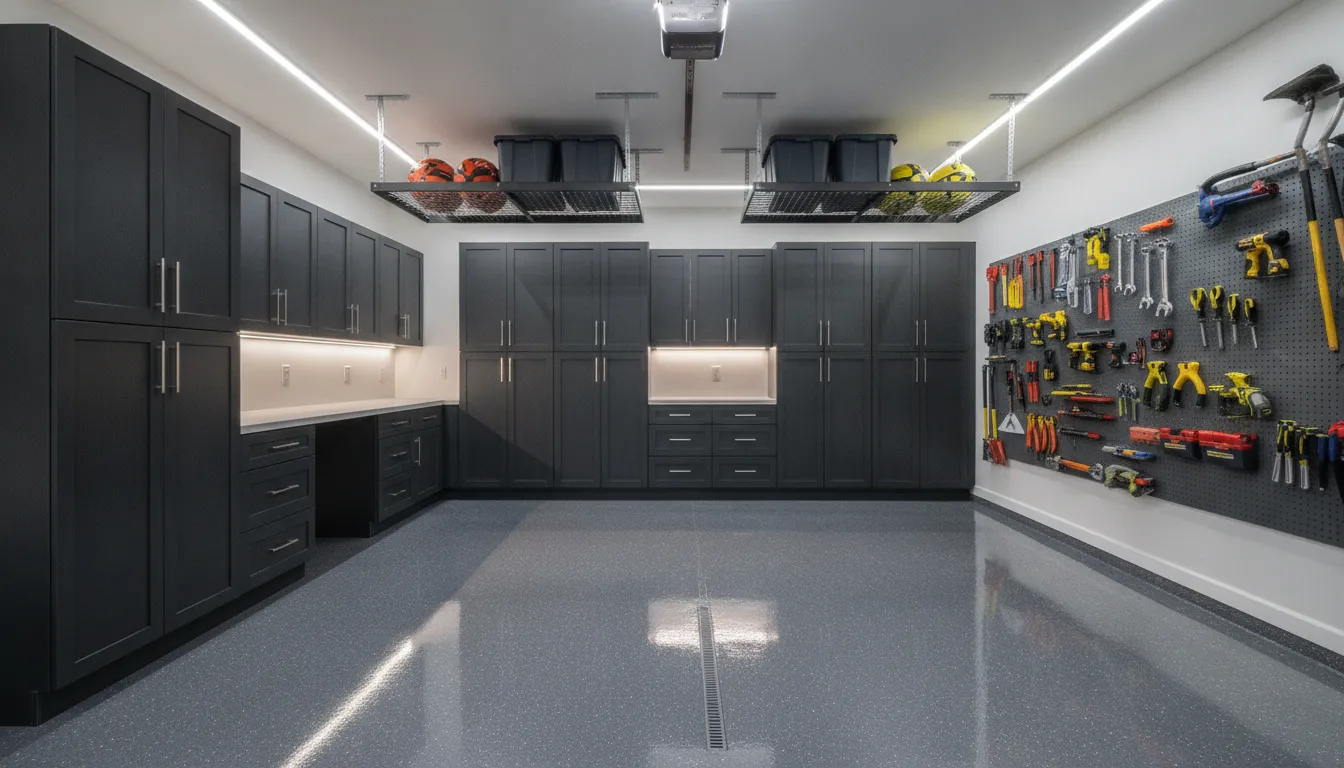
Garage Kings cabinet systems can combine wall-mounted and base cabinets with drawers, workstations, workbenches, tool storage, slatwall, and hooks. That integrated approach can make the garage feel intentional instead of pieced together. Explore these garage storage solutions alongside the available garage cabinet options as you decide which functions deserve dedicated space.
| Storage Type | Best Fit | Planning Consideration |
|---|---|---|
| Enclosed cabinets | Cleaning supplies, automotive products, small tools, and items you want out of sight | Group related supplies together, then reserve drawers for small parts and frequently used hand tools. |
| Wall and slatwall organization | Tools, extension cords, sports gear, and equipment that needs quick access | Use hooks, pegboards, or adjustable shelving to keep active-use items visible and off the floor. |
| Overhead storage | Seasonal decorations, bins, and belongings used less often | Plan around vehicles, doors, walkways, and ceiling structure. Rack capacity varies by system and structure. |
Map Belongings To Practical Zones
Start with the areas already defined by movement. The space beside a vehicle may suit a narrow cabinet or wall-mounted hooks for items used when entering and leaving. A work zone can bring a workstation, drawers, and tool storage together so projects do not spread across the parking area. Near the garage entrance, keep household and cleaning supplies accessible without requiring a trip beneath a ceiling rack.
Use vertical surfaces to protect usable floor area. Pegboards can hold tools and extension cords, while slatwall panels support adjustable shelving and hooks. Overhead racks extend storage into unused ceiling space, and documented systems may use heavy-duty steel, adjustable sizing, and rust-resistant finishes. Do not assume a universal load rating. The appropriate capacity depends on the selected system and the ceiling structure.
Finish the map by separating daily, weekly, and seasonal access. Labeling bins and leaving a clear path to each zone makes the system easier to maintain. The goal is not to fill every wall. It is to give each category a deliberate home, so putting the garage back in order takes less effort.
Use Lighting And Zones To Make The Garage Easier To Use
A garage becomes more useful when its layout supports the way your household actually moves through it. Instead of treating the room as one open storage area, divide it into clear zones for parking, projects, walking, and quick access. Then use lighting and storage placement to make those zones obvious at a glance.
Light The Workbench And Parking Areas First
Place the strongest, most even illumination where you complete tasks and where vehicles are parked. A workbench should have enough light for measuring, sorting hardware, or handling a small repair without relying on a single fixture at the center of the ceiling. Parking areas also benefit from consistent coverage, especially around doors, trunks, and the edges of the vehicle.
Walkways deserve attention as well. Keep the main path from the entry door to the house, driveway, or workbench visually clear. Lighting should help you see corners, floor transitions, and items that have been left temporarily in the wrong place. A clear route is easier to maintain when every zone has a defined purpose and a known storage destination.
Use Surfaces And Storage To Reinforce Each Zone
Light-colored walls or floors can reflect available light and make the garage feel more open. That effect is most useful when paired with an organized layout rather than used as a substitute for one. Keep frequently handled tools near the workbench. Pegboards can hold tools and extension cords where they remain visible, while slatwall panels can support adjustable shelving and hooks as your needs change.
Wall-mounted and overhead storage can keep bins, equipment, and seasonal items out of walking and parking areas. Store everyday items at a comfortable reach, and reserve higher locations for things used less often. This simple distinction reduces unnecessary searching and helps preserve the floor space needed for vehicles and movement.
Build A Daily Reset Into The Layout
The best organization system is one that can be reset without much effort. Give sports equipment, lawn supplies, automotive products, and cleaning tools a designated home. At the end of a project or parking cycle, return loose items to that home, clear the work surface, and keep the walkway open. A short daily reset prevents temporary piles from becoming permanent clutter.
As you plan a garage makeover, test each zone against real routines: where do you enter. What do you reach for first, and where does an item land when you are in a hurry? Those answers should guide the placement of lighting, hooks, shelves, and work surfaces so the finished garage stays functional after the transformation is complete.
See The Garage Makeover Before The Work Begins
A successful transformation starts with a clear understanding of how the garage needs to function. During a Garage Kings consultation, the process can include an in-home assessment, measurements, and a discussion of how you use the space each day. That means looking beyond a finish or a single storage product. The design can account for parking, tools, sports equipment, seasonal items, work areas, and the paths you need to keep clear.
Those details guide the development of a custom solution. Garage Kings coordinates professional floor coatings, custom storage, and garage door services so the finished space feels intentional rather than assembled one piece at a time. Floor performance, cabinet placement, overhead storage, and the garage door can be considered together, with the goal of creating a cleaner and more functional extension of the home.
Use Measurements To Make Better Design Decisions
Measurements help define what can fit, where doors and vehicles need clearance, and how storage can use wall or ceiling space without interfering with everyday movement. They also make it easier to plan around existing features, such as electrical outlets, windows, steps, and uneven surfaces. A design consultation is an opportunity to identify those conditions before installation, when adjustments are easier to make.
Depending on the local territory and the consultation process available there, the design experience may include 3D visualization using augmented reality. This can help you explore the proposed arrangement and develop a more practical sense of how floors, cabinets, and storage will work together before the work begins. AR should be understood as an available design option where applicable, not a feature guaranteed in every market.
Compare Finished Results With Your Everyday Goals
Before-and-after examples are useful when you evaluate more than appearance. Look for transformations that show how clutter was reduced, how walking paths were preserved, and how storage was matched to the homeowner’s routine. The garage transformation before and after gallery can help set realistic expectations for the relationship between the starting condition, selected services, and finished result.
Once the design is approved, professional installation brings the plan into the space. Garage Kings uses factory-trained or certified installers across its franchise network. Most projects are completed in one day, but the exact schedule depends on the selected services, preparation, and floor coating cure requirements. A clear plan lets your local team explain what will happen, what the space will need before installation, and when it will be ready for normal use.
FAQs: Garage Makeover
How Can I Make My Garage Look Better?
Start by clearing out items you no longer use, then plan the floor, walls, lighting, and storage as one coordinated space. A durable floor coating, organized cabinets, overhead storage, and brighter task lighting can make the garage feel cleaner, more finished, and easier to use.
How Can I Plan A Garage Makeover Without Overspending?
Define your priorities before selecting products. Measure the garage, identify the items that must be stored, and create zones for parking, tools, seasonal belongings, and projects. This helps you invest first in improvements that solve daily problems, while leaving optional upgrades for a later phase. A consultation can also clarify the scope without relying on a universal price.
What Are Common Mistakes To Avoid During A Garage Makeover?
Buying storage before decluttering, overlooking ceiling height, and choosing products without measuring the available space are common mistakes. It is also easy to focus on appearance while ignoring walking paths, vehicle clearance, lighting, and access to frequently used items. Plan the layout around real routines before installation begins.
What Should I Do First In A Garage Makeover?
Begin with a purge and thorough cleaning. Sort belongings into keep, donate, and discard groups, then measure the walls and ceiling and sketch the layout. Once you know what remains and where it belongs. You can select floor finishes and storage that fit the space instead of forcing the space to fit the products.
Should I Handle A Garage Makeover Myself Or Hire Professionals?
DIY work can suit small organizing or painting projects. Professional help is useful when you want coordinated floor coatings, custom storage, precise measurements, and installation across multiple parts of the garage. Garage Kings consultations can include an in-home assessment and 3D or AR visualization where applicable, so you can review a proposed design before work begins.
Start Planning Your Garage Transformation
A complete garage makeover starts with understanding how you use the space. A Garage Kings consultation can help assess the garage, take measurements, and develop a coordinated plan for flooring and storage, with AR 3D visualization where applicable. Services and territory availability vary.